Copyright © 2011-2015 The Apache Software Foundation, Licensed under the Apache License, Version 2.0. Apache Accumulo, Accumulo, Apache, and the Apache Accumulo project logo are trademarks of the Apache Software Foundation.
1. Introduction
Apache Accumulo is a highly scalable structured store based on Google’s BigTable. Accumulo is written in Java and operates over the Hadoop Distributed File System (HDFS), which is part of the popular Apache Hadoop project. Accumulo supports efficient storage and retrieval of structured data, including queries for ranges, and provides support for using Accumulo tables as input and output for MapReduce jobs.
Accumulo features automatic load-balancing and partitioning, data compression and fine-grained security labels.
2. Accumulo Design
2.1. Data Model
Accumulo provides a richer data model than simple key-value stores, but is not a fully relational database. Data is represented as key-value pairs, where the key and value are comprised of the following elements:
Key |
Value |
||||
Row ID |
Column |
Timestamp |
|||
Family |
Qualifier |
Visibility |
|||
All elements of the Key and the Value are represented as byte arrays except for Timestamp, which is a Long. Accumulo sorts keys by element and lexicographically in ascending order. Timestamps are sorted in descending order so that later versions of the same Key appear first in a sequential scan. Tables consist of a set of sorted key-value pairs.
2.2. Architecture
Accumulo is a distributed data storage and retrieval system and as such consists of several architectural components, some of which run on many individual servers. Much of the work Accumulo does involves maintaining certain properties of the data, such as organization, availability, and integrity, across many commodity-class machines.
2.3. Components
An instance of Accumulo includes many TabletServers, one Garbage Collector process, one Master server and many Clients.
2.3.1. Tablet Server
The TabletServer manages some subset of all the tablets (partitions of tables). This includes receiving writes from clients, persisting writes to a write-ahead log, sorting new key-value pairs in memory, periodically flushing sorted key-value pairs to new files in HDFS, and responding to reads from clients, forming a merge-sorted view of all keys and values from all the files it has created and the sorted in-memory store.
TabletServers also perform recovery of a tablet that was previously on a server that failed, reapplying any writes found in the write-ahead log to the tablet.
2.3.2. Garbage Collector
Accumulo processes will share files stored in HDFS. Periodically, the Garbage Collector will identify files that are no longer needed by any process, and delete them.
2.3.3. Master
The Accumulo Master is responsible for detecting and responding to TabletServer failure. It tries to balance the load across TabletServer by assigning tablets carefully and instructing TabletServers to unload tablets when necessary. The Master ensures all tablets are assigned to one TabletServer each, and handles table creation, alteration, and deletion requests from clients. The Master also coordinates startup, graceful shutdown and recovery of changes in write-ahead logs when Tablet servers fail.
Multiple masters may be run. The masters will choose among themselves a single master, and the others will become backups if the master should fail.
2.3.4. Client
Accumulo includes a client library that is linked to every application. The client library contains logic for finding servers managing a particular tablet, and communicating with TabletServers to write and retrieve key-value pairs.
2.4. Data Management
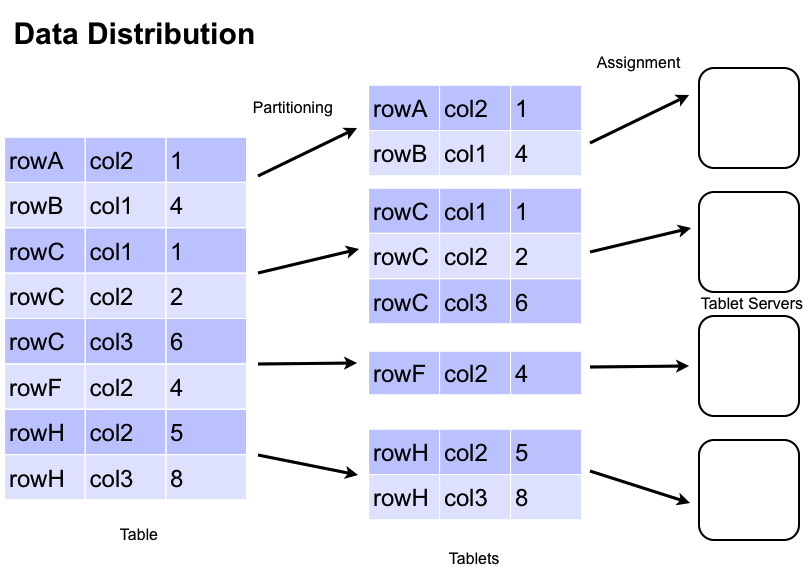
Accumulo stores data in tables, which are partitioned into tablets. Tablets are partitioned on row boundaries so that all of the columns and values for a particular row are found together within the same tablet. The Master assigns Tablets to one TabletServer at a time. This enables row-level transactions to take place without using distributed locking or some other complicated synchronization mechanism. As clients insert and query data, and as machines are added and removed from the cluster, the Master migrates tablets to ensure they remain available and that the ingest and query load is balanced across the cluster.
2.5. Tablet Service
When a write arrives at a TabletServer it is written to a Write-Ahead Log and then inserted into a sorted data structure in memory called a MemTable. When the MemTable reaches a certain size the TabletServer writes out the sorted key-value pairs to a file in HDFS called Indexed Sequential Access Method (ISAM) file. This process is called a minor compaction. A new MemTable is then created and the fact of the compaction is recorded in the Write-Ahead Log.
When a request to read data arrives at a TabletServer, the TabletServer does a binary search across the MemTable as well as the in-memory indexes associated with each ISAM file to find the relevant values. If clients are performing a scan, several key-value pairs are returned to the client in order from the MemTable and the set of ISAM files by performing a merge-sort as they are read.
2.6. Compactions
In order to manage the number of files per tablet, periodically the TabletServer performs Major Compactions of files within a tablet, in which some set of ISAM files are combined into one file. The previous files will eventually be removed by the Garbage Collector. This also provides an opportunity to permanently remove deleted key-value pairs by omitting key-value pairs suppressed by a delete entry when the new file is created.
2.7. Splitting
When a table is created it has one tablet. As the table grows its initial tablet eventually splits into two tablets. Its likely that one of these tablets will migrate to another tablet server. As the table continues to grow, its tablets will continue to split and be migrated. The decision to automatically split a tablet is based on the size of a tablets files. The size threshold at which a tablet splits is configurable per table. In addition to automatic splitting, a user can manually add split points to a table to create new tablets. Manually splitting a new table can parallelize reads and writes giving better initial performance without waiting for automatic splitting.
As data is deleted from a table, tablets may shrink. Over time this can lead to small or empty tablets. To deal with this, merging of tablets was introduced in Accumulo 1.4. This is discussed in more detail later.
2.8. Fault-Tolerance
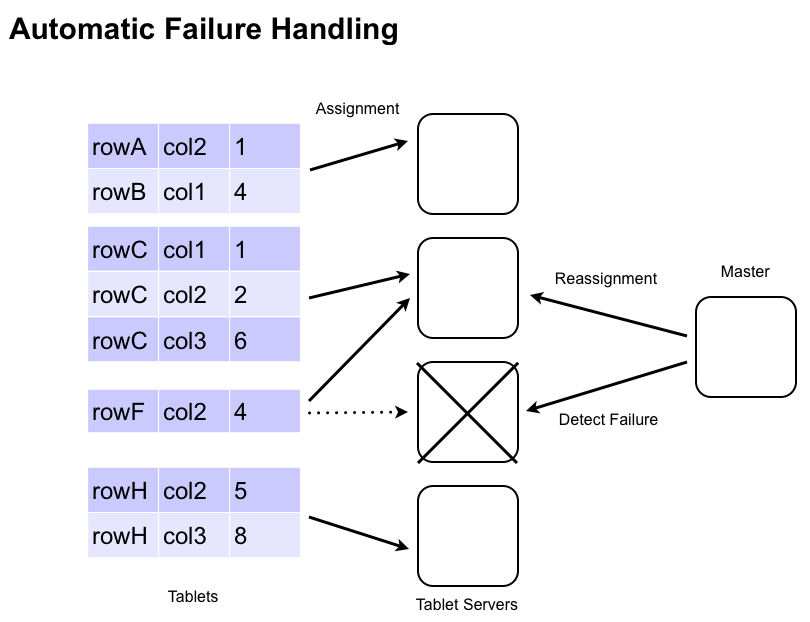
If a TabletServer fails, the Master detects it and automatically reassigns the tablets assigned from the failed server to other servers. Any key-value pairs that were in memory at the time the TabletServer fails are automatically reapplied from the Write-Ahead Log (WAL) to prevent any loss of data.
Tablet servers write their WALs directly to HDFS so the logs are available to all tablet servers for recovery. To make the recovery process efficient, the updates within a log are grouped by tablet. TabletServers can quickly apply the mutations from the sorted logs that are destined for the tablets they have now been assigned.
TabletServer failures are noted on the Master’s monitor page, accessible via
http://master-address:50095/monitor.
3. Accumulo Shell
Accumulo provides a simple shell that can be used to examine the contents and configuration settings of tables, insert/update/delete values, and change configuration settings.
The shell can be started by the following command:
$ACCUMULO_HOME/bin/accumulo shell -u [username]The shell will prompt for the corresponding password to the username specified and then display the following prompt:
Shell - Apache Accumulo Interactive Shell
-
- version 1.5
- instance name: myinstance
- instance id: 00000000-0000-0000-0000-000000000000
-
- type 'help' for a list of available commands
-
3.1. Basic Administration
The Accumulo shell can be used to create and delete tables, as well as to configure table and instance specific options.
root@myinstance> tables
!METADATA
root@myinstance> createtable mytableroot@myinstance mytable>root@myinstance mytable> tables
!METADATA
mytableroot@myinstance mytable> createtable testtableroot@myinstance testtable>root@myinstance testtable> deletetable testtable
deletetable { testtable } (yes|no)? yes
Table: [testtable] has been deleted.root@myinstance>The Shell can also be used to insert updates and scan tables. This is useful for inspecting tables.
root@myinstance mytable> scanroot@myinstance mytable> insert row1 colf colq value1
insert successfulroot@myinstance mytable> scan
row1 colf:colq [] value1The value in brackets “[]” would be the visibility labels. Since none were used, this is empty for this row. You can use the “-st” option to scan to see the timestamp for the cell, too.
3.2. Table Maintenance
The compact command instructs Accumulo to schedule a compaction of the table during which files are consolidated and deleted entries are removed.
root@myinstance mytable> compact -t mytable
07 16:13:53,201 [shell.Shell] INFO : Compaction of table mytable started for given range
The flush command instructs Accumulo to write all entries currently in memory for a given table to disk.
root@myinstance mytable> flush -t mytable
07 16:14:19,351 [shell.Shell] INFO : Flush of table mytable
initiated...
3.3. User Administration
The Shell can be used to add, remove, and grant privileges to users.
root@myinstance mytable> createuser bob
Enter new password for 'bob': *********
Please confirm new password for 'bob': *********
root@myinstance mytable> authenticate bob
Enter current password for 'bob': *********
Validroot@myinstance mytable> grant System.CREATE_TABLE -s -u bobroot@myinstance mytable> user bob
Enter current password for 'bob': *********bob@myinstance mytable> userpermissions
System permissions: System.CREATE_TABLE
Table permissions (!METADATA): Table.READ
Table permissions (mytable): NONEbob@myinstance mytable> createtable bobstable
bob@myinstance bobstable>bob@myinstance bobstable> user root
Enter current password for 'root': *********root@myinstance bobstable> revoke System.CREATE_TABLE -s -u bob4. Writing Accumulo Clients
4.1. Running Client Code
There are multiple ways to run Java code that uses Accumulo. Below is a list of the different ways to execute client code.
-
using java executable
-
using the accumulo script
-
using the tool script
In order to run client code written to run against Accumulo, you will need to include the jars that Accumulo depends on in your classpath. Accumulo client code depends on Hadoop and Zookeeper. For Hadoop add the hadoop client jar, all of the jars in the Hadoop lib directory, and the conf directory to the classpath. For Zookeeper 3.3 you only need to add the Zookeeper jar, and not what is in the Zookeeper lib directory. You can run the following command on a configured Accumulo system to see what its using for its classpath.
$ACCUMULO_HOME/bin/accumulo classpathAnother option for running your code is to put a jar file in
$ACCUMULO_HOME/lib/ext. After doing this you can use the accumulo
script to execute your code. For example if you create a jar containing the
class com.foo.Client and placed that in lib/ext, then you could use the command
$ACCUMULO_HOME/bin/accumulo com.foo.Client to execute your code.
If you are writing map reduce job that access Accumulo, then you can use the bin/tool.sh script to run those jobs. See the map reduce example.
4.2. Connecting
All clients must first identify the Accumulo instance to which they will be communicating. Code to do this is as follows:
String instanceName = "myinstance";
String zooServers = "zooserver-one,zooserver-two"
Instance inst = new ZooKeeperInstance(instanceName, zooServers);
Connector conn = inst.getConnector("user", new PasswordToken("passwd"));
4.3. Writing Data
Data is written to Accumulo by creating Mutation objects that represent all the changes to the columns of a single row. The changes are made atomically in the TabletServer. Clients then add Mutations to a BatchWriter which submits them to the appropriate TabletServers.
Mutations can be created thus:
Text rowID = new Text("row1");
Text colFam = new Text("myColFam");
Text colQual = new Text("myColQual");
ColumnVisibility colVis = new ColumnVisibility("public");
long timestamp = System.currentTimeMillis();

Value value = new Value("myValue".getBytes());

Mutation mutation = new Mutation(rowID);
mutation.put(colFam, colQual, colVis, timestamp, value);
4.3.1. BatchWriter
The BatchWriter is highly optimized to send Mutations to multiple TabletServers and automatically batches Mutations destined for the same TabletServer to amortize network overhead. Care must be taken to avoid changing the contents of any Object passed to the BatchWriter since it keeps objects in memory while batching.
Mutations are added to a BatchWriter thus:
//BatchWriterConfig has reasonable defaults
BatchWriterConfig config = new BatchWriterConfig();
config.setMaxMemory(10000000L); // bytes available to batchwriter for buffering mutations

BatchWriter writer = conn.createBatchWriter("table", config)

writer.add(mutation);

writer.close();
An example of using the batch writer can be found at
accumulo/docs/examples/README.batch
4.4. Reading Data
Accumulo is optimized to quickly retrieve the value associated with a given key, and to efficiently return ranges of consecutive keys and their associated values.
4.4.1. Scanner
To retrieve data, Clients use a Scanner, which acts like an Iterator over keys and values. Scanners can be configured to start and stop at particular keys, and to return a subset of the columns available.
// specify which visibilities we are allowed to see
Authorizations auths = new Authorizations("public");

Scanner scan =
    conn.createScanner("table", auths);

scan.setRange(new Range("harry","john"));
scan.fetchFamily("attributes");

for(Entry<Key,Value> entry : scan) {
    String row = entry.getKey().getRow();
    Value value = entry.getValue();
}
4.4.2. Isolated Scanner
Accumulo supports the ability to present an isolated view of rows when scanning. There are three possible ways that a row could change in Accumulo:
-
a mutation applied to a table
-
iterators executed as part of a minor or major compaction
-
bulk import of new files
Isolation guarantees that either all or none of the changes made by these operations on a row are seen. Use the IsolatedScanner to obtain an isolated view of an Accumulo table. When using the regular scanner it is possible to see a non isolated view of a row. For example if a mutation modifies three columns, it is possible that you will only see two of those modifications. With the isolated scanner either all three of the changes are seen or none.
The IsolatedScanner buffers rows on the client side so a large row will not crash a tablet server. By default rows are buffered in memory, but the user can easily supply their own buffer if they wish to buffer to disk when rows are large.
For an example, look at the following
examples/simple/src/main/java/org/apache/accumulo/examples/simple/isolation/InterferenceTest.java
4.4.3. BatchScanner
For some types of access, it is more efficient to retrieve several ranges simultaneously. This arises when accessing a set of rows that are not consecutive whose IDs have been retrieved from a secondary index, for example.
The BatchScanner is configured similarly to the Scanner; it can be configured to retrieve a subset of the columns available, but rather than passing a single Range, BatchScanners accept a set of Ranges. It is important to note that the keys returned by a BatchScanner are not in sorted order since the keys streamed are from multiple TabletServers in parallel.
ArrayList<Range> ranges = new ArrayList<Range>();
// populate list of ranges ...

BatchScanner bscan =
    conn.createBatchScanner("table", auths, 10);

bscan.setRanges(ranges);
bscan.fetchFamily("attributes");

for(Entry<Key,Value> entry : scan)
    System.out.println(entry.getValue());
An example of the BatchScanner can be found at
accumulo/docs/examples/README.batch
4.5. Proxy
The proxy API allows the interaction with Accumulo with languages other than Java. A proxy server is provided in the codebase and a client can further be generated.
4.5.1. Prequisites
The proxy server can live on any node in which the basic client API would work. That means it must be able to communicate with the Master, ZooKeepers, NameNode, and the DataNodes. A proxy client only needs the ability to communicate with the proxy server.
4.5.2. Configuration
The configuration options for the proxy server live inside of a properties file. At the very least, you need to supply the following properties:
protocolFactory=org.apache.thrift.protocol.TCompactProtocol$Factory
tokenClass=org.apache.accumulo.core.client.security.tokens.PasswordToken
port=42424
instance=test
zookeepers=localhost:2181
You can find a sample configuration file in your distribution:
$ACCUMULO_HOME/proxy/proxy.propertiesThis sample configuration file further demonstrates an ability to back the proxy server by MockAccumulo or the MiniAccumuloCluster.
4.5.3. Running the Proxy Server
After the properties file holding the configuration is created, the proxy server
can be started using the following command in the Accumulo distribution (assuming
your properties file is named config.properties):
$ACCUMULO_HOME/bin/accumulo proxy -p config.properties4.5.4. Creating a Proxy Client
Aside from installing the Thrift compiler, you will also need the language-specific library
for Thrift installed to generate client code in that language. Typically, your operating
system’s package manager will be able to automatically install these for you in an expected
location such as /usr/lib/python/site-packages/thrift.
You can find the thrift file for generating the client:
$ACCUMULO_HOME/proxy/proxy.thriftAfter a client is generated, the port specified in the configuration properties above will be used to connect to the server.
4.5.5. Using a Proxy Client
The following examples have been written in Java and the method signatures may be slightly different depending on the language specified when generating client with the Thrift compiler. After initiating a connection to the Proxy (see Apache Thrift’s documentation for examples of connecting to a Thrift service), the methods on the proxy client will be available. The first thing to do is log in:
Map password = new HashMap<String,String>();
password.put("password", "secret");
ByteBuffer token = client.login("root", password);
Once logged in, the token returned will be used for most subsequent calls to the client. Let’s create a table, add some data, scan the table, and delete it.
First, create a table.
client.createTable(token, "myTable", true, TimeType.MILLIS);
Next, add some data:
// first, create a writer on the server
String writer = client.createWriter(token, "myTable", new WriterOptions());

// build column updates
Map<ByteBuffer, List<ColumnUpdate> cells> cellsToUpdate = //...

// send updates to the server
client.updateAndFlush(writer, "myTable", cellsToUpdate);

client.closeWriter(writer);
Scan for the data and batch the return of the results on the server:
String scanner = client.createScanner(token, "myTable", new ScanOptions());
ScanResult results = client.nextK(scanner, 100);

for(KeyValue keyValue : results.getResultsIterator()) {
  // do something with results
}

client.closeScanner(scanner);
5. Development Clients
Normally, Accumulo consists of lots of moving parts. Even a stand-alone version of Accumulo requires Hadoop, Zookeeper, the Accumulo master, a tablet server, etc. If you want to write a unit test that uses Accumulo, you need a lot of infrastructure in place before your test can run.
5.1. Mock Accumulo
Mock Accumulo supplies mock implementations for much of the client API. It presently does not enforce users, logins, permissions, etc. It does support Iterators and Combiners. Note that MockAccumulo holds all data in memory, and will not retain any data or settings between runs.
While normal interaction with the Accumulo client looks like this:
Instance instance = new ZooKeeperInstance(...);
Connector conn = instance.getConnector(user, passwordToken);
To interact with the MockAccumulo, just replace the ZooKeeperInstance with MockInstance:
Instance instance = new MockInstance();
In fact, you can use the --fake option to the Accumulo shell and interact with
MockAccumulo:
$ ./bin/accumulo shell --fake -u root -p ''
Shell - Apache Accumulo Interactive Shell
-
- version: 1.5
- instance name: fake
- instance id: mock-instance-id
-
- type 'help' for a list of available commands
-
root@fake> createtable test
root@fake test> insert row1 cf cq value
root@fake test> insert row2 cf cq value2
root@fake test> insert row3 cf cq value3
root@fake test> scan
row1 cf:cq []    value
row2 cf:cq []    value2
row3 cf:cq []    value3
root@fake test> scan -b row2 -e row2
row2 cf:cq []    value2
root@fake test>
When testing Map Reduce jobs, you can also set the Mock Accumulo on the AccumuloInputFormat and AccumuloOutputFormat classes:
AccumuloInputFormat.setMockInstance(job, "mockInstance");
AccumuloOutputFormat.setMockInstance(job, "mockInstance");
5.2. Mini Accumulo Cluster
While the Mock Accumulo provides a lightweight implementation of the client API for unit testing, it is often necessary to write more realistic end-to-end integration tests that take advantage of the entire ecosystem. The Mini Accumulo Cluster makes this possible by configuring and starting Zookeeper, initializing Accumulo, and starting the Master as well as some Tablet Servers. It runs against the local filesystem instead of having to start up HDFS.
To start it up, you will need to supply an empty directory and a root password as arguments:
File tempDirectory = // JUnit and Guava supply mechanisms for creating temp directories
MiniAccumuloCluster accumulo = new MiniAccumuloCluster(tempDirectory, "password");
accumulo.start();
Once we have our mini cluster running, we will want to interact with the Accumulo client API:
Instance instance = new ZooKeeperInstance(accumulo.getInstanceName(), accumulo.getZooKeepers());
Connector conn = instance.getConnector("root", new PasswordToken("password"));
Upon completion of our development code, we will want to shutdown our MiniAccumuloCluster:
accumulo.stop()
// delete your temporary folder
6. Table Configuration
Accumulo tables have a few options that can be configured to alter the default behavior of Accumulo as well as improve performance based on the data stored. These include locality groups, constraints, bloom filters, iterators, and block cache.
6.1. Locality Groups
Accumulo supports storing sets of column families separately on disk to allow clients to efficiently scan over columns that are frequently used together and to avoid scanning over column families that are not requested. After a locality group is set, Scanner and BatchScanner operations will automatically take advantage of them whenever the fetchColumnFamilies() method is used.
By default, tables place all column families into the same “default” locality group. Additional locality groups can be configured at any time via the shell or programmatically as follows:
6.1.1. Managing Locality Groups via the Shell
usage: setgroups <group>=<col fam>{,<col fam>}{ <group>=<col fam>{,<col fam>}}
   [-?] -t <table>
user@myinstance mytable> setgroups group_one=colf1,colf2 -t mytableuser@myinstance mytable> getgroups -t mytable6.1.2. Managing Locality Groups via the Client API
Connector conn;

HashMap<String,Set<Text>> localityGroups = new HashMap<String, Set<Text>>();

HashSet<Text> metadataColumns = new HashSet<Text>();
metadataColumns.add(new Text("domain"));
metadataColumns.add(new Text("link"));

HashSet<Text> contentColumns = new HashSet<Text>();
contentColumns.add(new Text("body"));
contentColumns.add(new Text("images"));

localityGroups.put("metadata", metadataColumns);
localityGroups.put("content", contentColumns);

conn.tableOperations().setLocalityGroups("mytable", localityGroups);

// existing locality groups can be obtained as follows
Map<String, Set<Text>> groups =
    conn.tableOperations().getLocalityGroups("mytable");
The assignment of Column Families to Locality Groups can be changed at any time. The physical movement of column families into their new locality groups takes place via the periodic Major Compaction process that takes place continuously in the background. Major Compaction can also be scheduled to take place immediately through the shell:
user@myinstance mytable> compact -t mytable6.2. Constraints
Accumulo supports constraints applied on mutations at insert time. This can be used to disallow certain inserts according to a user defined policy. Any mutation that fails to meet the requirements of the constraint is rejected and sent back to the client.
Constraints can be enabled by setting a table property as follows:
user@myinstance mytable> constraint -t mytable -a com.test.ExampleConstraint com.test.AnotherConstraint
user@myinstance mytable> constraint -l
com.test.ExampleConstraint=1
com.test.AnotherConstraint=2
Currently there are no general-purpose constraints provided with the Accumulo distribution. New constraints can be created by writing a Java class that implements the org.apache.accumulo.core.constraints.Constraint interface.
To deploy a new constraint, create a jar file containing the class implementing the new constraint and place it in the lib directory of the Accumulo installation. New constraint jars can be added to Accumulo and enabled without restarting but any change to an existing constraint class requires Accumulo to be restarted.
An example of constraints can be found in
accumulo/docs/examples/README.constraints with corresponding code under
accumulo/examples/simple/main/java/accumulo/examples/simple/constraints.
6.3. Bloom Filters
As mutations are applied to an Accumulo table, several files are created per tablet. If bloom filters are enabled, Accumulo will create and load a small data structure into memory to determine whether a file contains a given key before opening the file. This can speed up lookups considerably.
To enable bloom filters, enter the following command in the Shell:
user@myinstance> config -t mytable -s table.bloom.enabled=trueAn extensive example of using Bloom Filters can be found at
accumulo/docs/examples/README.bloom.
6.4. Iterators
Iterators provide a modular mechanism for adding functionality to be executed by
TabletServers when scanning or compacting data. This allows users to efficiently
summarize, filter, and aggregate data. In fact, the built-in features of cell-level
security and column fetching are implemented using Iterators.
Some useful Iterators are provided with Accumulo and can be found in the
org.apache.accumulo.core.iterators.user package.
In each case, any custom Iterators must be included in Accumulo’s classpath,
typically by including a jar in $ACCUMULO_HOME/lib or
$ACCUMULO_HOME/lib/ext, although the VFS classloader allows for
classpath manipulation using a variety of schemes including URLs and HDFS URIs.
6.4.1. Setting Iterators via the Shell
Iterators can be configured on a table at scan, minor compaction and/or major compaction scopes. If the Iterator implements the OptionDescriber interface, the setiter command can be used which will interactively prompt the user to provide values for the given necessary options.
usage: setiter [-?] -ageoff | -agg | -class <name> | -regex |
  -reqvis | -vers   [-majc] [-minc] [-n <itername>] -p <pri>
  [-scan] [-t <table>]
user@myinstance mytable> setiter -t mytable -scan -p 15 -n myiter -class com.company.MyIteratorThe config command can always be used to manually configure iterators which is useful in cases where the Iterator does not implement the OptionDescriber interface.
config -t mytable -s table.iterator.{scan|minc|majc}.myiter=15,com.company.MyIterator
config -t mytable -s table.iteartor.{scan|minc|majc}.myiter.opt.myoptionname=myoptionvalue
6.4.2. Setting Iterators Programmatically
scanner.addIterator(new IteratorSetting(
    15, // priority
    "myiter", // name this iterator
    "com.company.MyIterator" // class name
));
Some iterators take additional parameters from client code, as in the following example:
IteratorSetting iter = new IteratorSetting(...);
iter.addOption("myoptionname", "myoptionvalue");
scanner.addIterator(iter)
Tables support separate Iterator settings to be applied at scan time, upon minor compaction and upon major compaction. For most uses, tables will have identical iterator settings for all three to avoid inconsistent results.
6.4.3. Versioning Iterators and Timestamps
Accumulo provides the capability to manage versioned data through the use of timestamps within the Key. If a timestamp is not specified in the key created by the client then the system will set the timestamp to the current time. Two keys with identical rowIDs and columns but different timestamps are considered two versions of the same key. If two inserts are made into Accumulo with the same rowID, column, and timestamp, then the behavior is non-deterministic.
Timestamps are sorted in descending order, so the most recent data comes first. Accumulo can be configured to return the top k versions, or versions later than a given date. The default is to return the one most recent version.
The version policy can be changed by changing the VersioningIterator options for a table as follows:
user@myinstance mytable> config -t mytable -s table.iterator.scan.vers.opt.maxVersions=3
user@myinstance mytable> config -t mytable -s table.iterator.minc.vers.opt.maxVersions=3
user@myinstance mytable> config -t mytable -s table.iterator.majc.vers.opt.maxVersions=3
When a table is created, by default its configured to use the VersioningIterator and keep one version. A table can be created without the VersioningIterator with the -ndi option in the shell. Also the Java API has the following method
connector.tableOperations.create(String tableName, boolean limitVersion)
Logical Time
Accumulo 1.2 introduces the concept of logical time. This ensures that timestamps set by Accumulo always move forward. This helps avoid problems caused by TabletServers that have different time settings. The per tablet counter gives unique one up time stamps on a per mutation basis. When using time in milliseconds, if two things arrive within the same millisecond then both receive the same timestamp. When using time in milliseconds, Accumulo set times will still always move forward and never backwards.
A table can be configured to use logical timestamps at creation time as follows:
user@myinstance> createtable -tl logicalDeletes
Deletes are special keys in Accumulo that get sorted along will all the other data. When a delete key is inserted, Accumulo will not show anything that has a timestamp less than or equal to the delete key. During major compaction, any keys older than a delete key are omitted from the new file created, and the omitted keys are removed from disk as part of the regular garbage collection process.
6.4.4. Filters
When scanning over a set of key-value pairs it is possible to apply an arbitrary
filtering policy through the use of a Filter. Filters are types of iterators that return
only key-value pairs that satisfy the filter logic. Accumulo has a few built-in filters
that can be configured on any table: AgeOff, ColumnAgeOff, Timestamp, NoVis, and RegEx. More can be added
by writing a Java class that extends the
org.apache.accumulo.core.iterators.Filter class.
The AgeOff filter can be configured to remove data older than a certain date or a fixed amount of time from the present. The following example sets a table to delete everything inserted over 30 seconds ago:
user@myinstance> createtable filtertest
user@myinstance filtertest> setiter -t filtertest -scan -minc -majc -p 10 -n myfilter -ageoff
AgeOffFilter removes entries with timestamps more than <ttl> milliseconds old
----------> set org.apache.accumulo.core.iterators.user.AgeOffFilter parameter
   negate, default false keeps k/v that pass accept method, true rejects k/v
   that pass accept method:
----------> set org.apache.accumulo.core.iterators.user.AgeOffFilter parameter
   ttl, time to live (milliseconds): 3000
----------> set org.apache.accumulo.core.iterators.user.AgeOffFilter parameter
   currentTime, if set, use the given value as the absolute time in milliseconds
   as the current time of day:
user@myinstance filtertest>
user@myinstance filtertest> scan
user@myinstance filtertest> insert foo a b c
user@myinstance filtertest> scan
foo a:b [] c
user@myinstance filtertest> sleep 4
user@myinstance filtertest> scan
user@myinstance filtertest>
To see the iterator settings for a table, use:
user@example filtertest> config -t filtertest -f iterator
---------+---------------------------------------------+------------------
SCOPE    | NAME                                        | VALUE
---------+---------------------------------------------+------------------
table    | table.iterator.majc.myfilter .............. | 10,org.apache.accumulo.core.iterators.user.AgeOffFilter
table    | table.iterator.majc.myfilter.opt.ttl ...... | 3000
table    | table.iterator.majc.vers .................. | 20,org.apache.accumulo.core.iterators.VersioningIterator
table    | table.iterator.majc.vers.opt.maxVersions .. | 1
table    | table.iterator.minc.myfilter .............. | 10,org.apache.accumulo.core.iterators.user.AgeOffFilter
table    | table.iterator.minc.myfilter.opt.ttl ...... | 3000
table    | table.iterator.minc.vers .................. | 20,org.apache.accumulo.core.iterators.VersioningIterator
table    | table.iterator.minc.vers.opt.maxVersions .. | 1
table    | table.iterator.scan.myfilter .............. | 10,org.apache.accumulo.core.iterators.user.AgeOffFilter
table    | table.iterator.scan.myfilter.opt.ttl ...... | 3000
table    | table.iterator.scan.vers .................. | 20,org.apache.accumulo.core.iterators.VersioningIterator
table    | table.iterator.scan.vers.opt.maxVersions .. | 1
---------+---------------------------------------------+------------------
6.4.5. Combiners
Accumulo allows Combiners to be configured on tables and column families. When a Combiner is set it is applied across the values associated with any keys that share rowID, column family, and column qualifier. This is similar to the reduce step in MapReduce, which applied some function to all the values associated with a particular key.
For example, if a summing combiner were configured on a table and the following mutations were inserted:
Row     Family Qualifier Timestamp  Value
rowID1  colfA  colqA     20100101   1
rowID1  colfA  colqA     20100102   1
The table would reflect only one aggregate value:
rowID1 colfA colqA - 2Combiners can be enabled for a table using the setiter command in the shell. Below is an example.
root@a14 perDayCounts> setiter -t perDayCounts -p 10 -scan -minc -majc -n daycount -class org.apache.accumulo.core.iterators.user.SummingCombiner
TypedValueCombiner can interpret Values as a variety of number encodings
  (VLong, Long, or String) before combining
----------> set SummingCombiner parameter columns,
            <col fam>[:<col qual>]{,<col fam>[:<col qual>]} : day
----------> set SummingCombiner parameter type, <VARNUM|LONG|STRING>: STRING
root@a14 perDayCounts> insert foo day 20080101 1
root@a14 perDayCounts> insert foo day 20080101 1
root@a14 perDayCounts> insert foo day 20080103 1
root@a14 perDayCounts> insert bar day 20080101 1
root@a14 perDayCounts> insert bar day 20080101 1root@a14 perDayCounts> scan
bar day:20080101 [] 2
foo day:20080101 [] 2
foo day:20080103 [] 1Accumulo includes some useful Combiners out of the box. To find these look in
the org.apache.accumulo.core.iterators.user package.
Additional Combiners can be added by creating a Java class that extends
org.apache.accumulo.core.iterators.Combiner and adding a jar containing that
class to Accumulo’s lib/ext directory.
An example of a Combiner can be found under
accumulo/examples/simple/main/java/org/apache/accumulo/examples/simple/combiner/StatsCombiner.java
6.5. Block Cache
In order to increase throughput of commonly accessed entries, Accumulo employs a block cache. This block cache buffers data in memory so that it doesn’t have to be read off of disk. The RFile format that Accumulo prefers is a mix of index blocks and data blocks, where the index blocks are used to find the appropriate data blocks. Typical queries to Accumulo result in a binary search over several index blocks followed by a linear scan of one or more data blocks.
The block cache can be configured on a per-table basis, and all tablets hosted on a tablet server share a single resource pool. To configure the size of the tablet server’s block cache, set the following properties:
tserver.cache.data.size: Specifies the size of the cache for file data blocks.
tserver.cache.index.size: Specifies the size of the cache for file indices.
To enable the block cache for your table, set the following properties:
table.cache.block.enable: Determines whether file (data) block cache is enabled.
table.cache.index.enable: Determines whether index cache is enabled.
The block cache can have a significant effect on alleviating hot spots, as well as reducing query latency. It is enabled by default for the !METADATA table.
6.6. Compaction
As data is written to Accumulo it is buffered in memory. The data buffered in memory is eventually written to HDFS on a per tablet basis. Files can also be added to tablets directly by bulk import. In the background tablet servers run major compactions to merge multiple files into one. The tablet server has to decide which tablets to compact and which files within a tablet to compact. This decision is made using the compaction ratio, which is configurable on a per table basis. To configure this ratio modify the following property:
table.compaction.major.ratioIncreasing this ratio will result in more files per tablet and less compaction work. More files per tablet means more higher query latency. So adjusting this ratio is a trade off between ingest and query performance. The ratio defaults to 3.
The way the ratio works is that a set of files is compacted into one file if the sum of the sizes of the files in the set is larger than the ratio multiplied by the size of the largest file in the set. If this is not true for the set of all files in a tablet, the largest file is removed from consideration, and the remaining files are considered for compaction. This is repeated until a compaction is triggered or there are no files left to consider.
The number of background threads tablet servers use to run major compactions is configurable. To configure this modify the following property:
tserver.compaction.major.concurrent.maxAlso, the number of threads tablet servers use for minor compactions is configurable. To configure this modify the following property:
tserver.compaction.minor.concurrent.maxThe numbers of minor and major compactions running and queued is visible on the Accumulo monitor page. This allows you to see if compactions are backing up and adjustments to the above settings are needed. When adjusting the number of threads available for compactions, consider the number of cores and other tasks running on the nodes such as maps and reduces.
If major compactions are not keeping up, then the number of files per tablet will grow to a point such that query performance starts to suffer. One way to handle this situation is to increase the compaction ratio. For example, if the compaction ratio were set to 1, then every new file added to a tablet by minor compaction would immediately queue the tablet for major compaction. So if a tablet has a 200M file and minor compaction writes a 1M file, then the major compaction will attempt to merge the 200M and 1M file. If the tablet server has lots of tablets trying to do this sort of thing, then major compactions will back up and the number of files per tablet will start to grow, assuming data is being continuously written. Increasing the compaction ratio will alleviate backups by lowering the amount of major compaction work that needs to be done.
Another option to deal with the files per tablet growing too large is to adjust the following property:
table.file.maxWhen a tablet reaches this number of files and needs to flush its in-memory data to disk, it will choose to do a merging minor compaction. A merging minor compaction will merge the tablet’s smallest file with the data in memory at minor compaction time. Therefore the number of files will not grow beyond this limit. This will make minor compactions take longer, which will cause ingest performance to decrease. This can cause ingest to slow down until major compactions have enough time to catch up. When adjusting this property, also consider adjusting the compaction ratio. Ideally, merging minor compactions never need to occur and major compactions will keep up. It is possible to configure the file max and compaction ratio such that only merging minor compactions occur and major compactions never occur. This should be avoided because doing only merging minor compactions causes O(N2) work to be done. The amount of work done by major compactions is O(N*logR(N)) where R is the compaction ratio.
Compactions can be initiated manually for a table. To initiate a minor compaction, use the flush command in the shell. To initiate a major compaction, use the compact command in the shell. The compact command will compact all tablets in a table to one file. Even tablets with one file are compacted. This is useful for the case where a major compaction filter is configured for a table. In 1.4 the ability to compact a range of a table was added. To use this feature specify start and stop rows for the compact command. This will only compact tablets that overlap the given row range.
6.7. Pre-splitting tables
Accumulo will balance and distribute tables across servers. Before a table gets large, it will be maintained as a single tablet on a single server. This limits the speed at which data can be added or queried to the speed of a single node. To improve performance when the a table is new, or small, you can add split points and generate new tablets.
In the shell:
root@myinstance> createtable newTable
root@myinstance> addsplits -t newTable g n t
This will create a new table with 4 tablets. The table will be split on the letters “g”, “n”, and “t” which will work nicely if the row data start with lower-case alphabetic characters. If your row data includes binary information or numeric information, or if the distribution of the row information is not flat, then you would pick different split points. Now ingest and query can proceed on 4 nodes which can improve performance.
6.8. Merging tablets
Over time, a table can get very large, so large that it has hundreds of thousands of split points. Once there are enough tablets to spread a table across the entire cluster, additional splits may not improve performance, and may create unnecessary bookkeeping. The distribution of data may change over time. For example, if row data contains date information, and data is continually added and removed to maintain a window of current information, tablets for older rows may be empty.
Accumulo supports tablet merging, which can be used to reduce the number of split points. The following command will merge all rows from “A” to “Z” into a single tablet:
root@myinstance> merge -t myTable -s A -e ZIf the result of a merge produces a tablet that is larger than the configured split size, the tablet may be split by the tablet server. Be sure to increase your tablet size prior to any merges if the goal is to have larger tablets:
root@myinstance> config -t myTable -s table.split.threshold=2GIn order to merge small tablets, you can ask Accumulo to merge sections of a table smaller than a given size.
root@myinstance> merge -t myTable -s 100MBy default, small tablets will not be merged into tablets that are already larger than the given size. This can leave isolated small tablets. To force small tablets to be merged into larger tablets use the “--{}--force” option:
root@myinstance> merge -t myTable -s 100M --forceMerging away small tablets works on one section at a time. If your table contains many sections of small split points, or you are attempting to change the split size of the entire table, it will be faster to set the split point and merge the entire table:
root@myinstance> config -t myTable -s table.split.threshold=256M
root@myinstance> merge -t myTable
6.9. Delete Range
Consider an indexing scheme that uses date information in each row. For example “20110823-15:20:25.013” might be a row that specifies a date and time. In some cases, we might like to delete rows based on this date, say to remove all the data older than the current year. Accumulo supports a delete range operation which efficiently removes data between two rows. For example:
root@myinstance> deleterange -t myTable -s 2010 -e 2011This will delete all rows starting with “2010” and it will stop at any row starting “2011”. You can delete any data prior to 2011 with:
root@myinstance> deleterange -t myTable -e 2011 --forceThe shell will not allow you to delete an unbounded range (no start) unless you provide the “--{}--force” option.
Range deletion is implemented using splits at the given start/end positions, and will affect the number of splits in the table.
6.10. Cloning Tables
A new table can be created that points to an existing table’s data. This is a very quick metadata operation, no data is actually copied. The cloned table and the source table can change independently after the clone operation. One use case for this feature is testing. For example to test a new filtering iterator, clone the table, add the filter to the clone, and force a major compaction. To perform a test on less data, clone a table and then use delete range to efficiently remove a lot of data from the clone. Another use case is generating a snapshot to guard against human error. To create a snapshot, clone a table and then disable write permissions on the clone.
The clone operation will point to the source table’s files. This is why the flush option is present and is enabled by default in the shell. If the flush option is not enabled, then any data the source table currently has in memory will not exist in the clone.
A cloned table copies the configuration of the source table. However the permissions of the source table are not copied to the clone. After a clone is created, only the user that created the clone can read and write to it.
In the following example we see that data inserted after the clone operation is not visible in the clone.
root@a14> createtable people
root@a14 people> insert 890435 name last Doe
root@a14 people> insert 890435 name first John
root@a14 people> clonetable people test
root@a14 people> insert 890436 name first Jane
root@a14 people> insert 890436 name last Doe
root@a14 people> scan
890435 name:first []    John
890435 name:last []    Doe
890436 name:first []    Jane
890436 name:last []    Doe
root@a14 people> table test
root@a14 test> scan
890435 name:first []    John
890435 name:last []    Doe
root@a14 test>
The du command in the shell shows how much space a table is using in HDFS. This command can also show how much overlapping space two cloned tables have in HDFS. In the example below du shows table ci is using 428M. Then ci is cloned to cic and du shows that both tables share 428M. After three entries are inserted into cic and its flushed, du shows the two tables still share 428M but cic has 226 bytes to itself. Finally, table cic is compacted and then du shows that each table uses 428M.
root@a14> du ci
             428,482,573 [ci]
root@a14> clonetable ci cic
root@a14> du ci cic
             428,482,573 [ci, cic]
root@a14> table cic
root@a14 cic> insert r1 cf1 cq1 v1
root@a14 cic> insert r1 cf1 cq2 v2
root@a14 cic> insert r1 cf1 cq3 v3
root@a14 cic> flush -t cic -w
27 15:00:13,908 [shell.Shell] INFO : Flush of table cic completed.
root@a14 cic> du ci cic
             428,482,573 [ci, cic]
                     226 [cic]
root@a14 cic> compact -t cic -w
27 15:00:35,871 [shell.Shell] INFO : Compacting table ...
27 15:03:03,303 [shell.Shell] INFO : Compaction of table cic completed for given range
root@a14 cic> du ci cic
             428,482,573 [ci]
             428,482,612 [cic]
root@a14 cic>
6.11. Exporting Tables
Accumulo supports exporting tables for the purpose of copying tables to another cluster. Exporting and importing tables preserves the tables configuration, splits, and logical time. Tables are exported and then copied via the hadoop distcp command. To export a table, it must be offline and stay offline while discp runs. The reason it needs to stay offline is to prevent files from being deleted. A table can be cloned and the clone taken offline inorder to avoid losing access to the table. See docs/examples/README.export for an example.
7. Table Design
7.1. Basic Table
Since Accumulo tables are sorted by row ID, each table can be thought of as being indexed by the row ID. Lookups performed by row ID can be executed quickly, by doing a binary search, first across the tablets, and then within a tablet. Clients should choose a row ID carefully in order to support their desired application. A simple rule is to select a unique identifier as the row ID for each entity to be stored and assign all the other attributes to be tracked to be columns under this row ID. For example, if we have the following data in a comma-separated file:
userid,age,address,account-balanceWe might choose to store this data using the userid as the rowID and the rest of the data in column families:
Mutation m = new Mutation(new Text(userid));
m.put(new Text("age"), age);
m.put(new Text("address"), address);
m.put(new Text("balance"), account_balance);

writer.add(m);
We could then retrieve any of the columns for a specific userid by specifying the userid as the range of a scanner and fetching specific columns:
Range r = new Range(userid, userid); // single row
Scanner s = conn.createScanner("userdata", auths);
s.setRange(r);
s.fetchColumnFamily(new Text("age"));

for(Entry<Key,Value> entry : s)
    System.out.println(entry.getValue().toString());
7.2. RowID Design
Often it is necessary to transform the rowID in order to have rows ordered in a way that is optimal for anticipated access patterns. A good example of this is reversing the order of components of internet domain names in order to group rows of the same parent domain together:
com.google.code
com.google.labs
com.google.mail
com.yahoo.mail
com.yahoo.research
Some data may result in the creation of very large rows - rows with many columns. In this case the table designer may wish to split up these rows for better load balancing while keeping them sorted together for scanning purposes. This can be done by appending a random substring at the end of the row:
com.google.code_00
com.google.code_01
com.google.code_02
com.google.labs_00
com.google.mail_00
com.google.mail_01
It could also be done by adding a string representation of some period of time such as date to the week or month:
com.google.code_201003
com.google.code_201004
com.google.code_201005
com.google.labs_201003
com.google.mail_201003
com.google.mail_201004
Appending dates provides the additional capability of restricting a scan to a given date range.
7.3. Indexing
In order to support lookups via more than one attribute of an entity, additional indexes can be built. However, because Accumulo tables can support any number of columns without specifying them beforehand, a single additional index will often suffice for supporting lookups of records in the main table. Here, the index has, as the rowID, the Value or Term from the main table, the column families are the same, and the column qualifier of the index table contains the rowID from the main table.
| RowID | Column Family | Column Qualifier | Value |
|---|---|---|---|
Term |
Field Name |
MainRowID |
Note: We store rowIDs in the column qualifier rather than the Value so that we can have more than one rowID associated with a particular term within the index. If we stored this in the Value we would only see one of the rows in which the value appears since Accumulo is configured by default to return the one most recent value associated with a key.
Lookups can then be done by scanning the Index Table first for occurrences of the desired values in the columns specified, which returns a list of row ID from the main table. These can then be used to retrieve each matching record, in their entirety, or a subset of their columns, from the Main Table.
To support efficient lookups of multiple rowIDs from the same table, the Accumulo client library provides a BatchScanner. Users specify a set of Ranges to the BatchScanner, which performs the lookups in multiple threads to multiple servers and returns an Iterator over all the rows retrieved. The rows returned are NOT in sorted order, as is the case with the basic Scanner interface.
// first we scan the index for IDs of rows matching our query

Text term = new Text("mySearchTerm");

HashSet<Range> matchingRows = new HashSet<Range>();

Scanner indexScanner = createScanner("index", auths);
indexScanner.setRange(new Range(term, term));

// we retrieve the matching rowIDs and create a set of ranges
for(Entry<Key,Value> entry : indexScanner)
    matchingRows.add(new Range(entry.getKey().getColumnQualifier()));

// now we pass the set of rowIDs to the batch scanner to retrieve them
BatchScanner bscan = conn.createBatchScanner("table", auths, 10);

bscan.setRanges(matchingRows);
bscan.fetchColumnFamily(new Text("attributes"));

for(Entry<Key,Value> entry : bscan)
    System.out.println(entry.getValue());
One advantage of the dynamic schema capabilities of Accumulo is that different fields may be indexed into the same physical table. However, it may be necessary to create different index tables if the terms must be formatted differently in order to maintain proper sort order. For example, real numbers must be formatted differently than their usual notation in order to be sorted correctly. In these cases, usually one index per unique data type will suffice.
7.4. Entity-Attribute and Graph Tables
Accumulo is ideal for storing entities and their attributes, especially of the attributes are sparse. It is often useful to join several datasets together on common entities within the same table. This can allow for the representation of graphs, including nodes, their attributes, and connections to other nodes.
Rather than storing individual events, Entity-Attribute or Graph tables store aggregate information about the entities involved in the events and the relationships between entities. This is often preferrable when single events aren’t very useful and when a continuously updated summarization is desired.
The physical schema for an entity-attribute or graph table is as follows:
| RowID | Column Family | Column Qualifier | Value |
|---|---|---|---|
EntityID |
Attribute Name |
Attribute Value |
Weight |
EntityID |
Edge Type |
Related EntityID |
Weight |
For example, to keep track of employees, managers and products the following entity-attribute table could be used. Note that the weights are not always necessary and are set to 0 when not used.
| RowID | Column Family | Column Qualifier | Value |
|---|---|---|---|
E001 |
name |
bob |
0 |
E001 |
department |
sales |
0 |
E001 |
hire_date |
20030102 |
0 |
E001 |
units_sold |
P001 |
780 |
E002 |
name |
george |
0 |
E002 |
department |
sales |
0 |
E002 |
manager_of |
E001 |
0 |
E002 |
manager_of |
E003 |
0 |
E003 |
name |
harry |
0 |
E003 |
department |
accounts_recv |
0 |
E003 |
hire_date |
20000405 |
0 |
E003 |
units_sold |
P002 |
566 |
E003 |
units_sold |
P001 |
232 |
P001 |
product_name |
nike_airs |
0 |
P001 |
product_type |
shoe |
0 |
P001 |
in_stock |
germany |
900 |
P001 |
in_stock |
brazil |
200 |
P002 |
product_name |
basic_jacket |
0 |
P002 |
product_type |
clothing |
0 |
P002 |
in_stock |
usa |
3454 |
P002 |
in_stock |
germany |
700 |
To allow efficient updating of edge weights, an aggregating iterator can be configured to add the value of all mutations applied with the same key. These types of tables can easily be created from raw events by simply extracting the entities, attributes, and relationships from individual events and inserting the keys into Accumulo each with a count of 1. The aggregating iterator will take care of maintaining the edge weights.
7.5. Document-Partitioned Indexing
Using a simple index as described above works well when looking for records that match one of a set of given criteria. When looking for records that match more than one criterion simultaneously, such as when looking for documents that contain all of the words ‘the’ and ‘white’ and ‘house’, there are several issues.
First is that the set of all records matching any one of the search terms must be sent to the client, which incurs a lot of network traffic. The second problem is that the client is responsible for performing set intersection on the sets of records returned to eliminate all but the records matching all search terms. The memory of the client may easily be overwhelmed during this operation.
For these reasons Accumulo includes support for a scheme known as sharded indexing, in which these set operations can be performed at the TabletServers and decisions about which records to include in the result set can be made without incurring network traffic.
This is accomplished via partitioning records into bins that each reside on at most one TabletServer, and then creating an index of terms per record within each bin as follows:
| RowID | Column Family | Column Qualifier | Value |
|---|---|---|---|
BinID |
Term |
DocID |
Weight |
Documents or records are mapped into bins by a user-defined ingest application. By storing the BinID as the RowID we ensure that all the information for a particular bin is contained in a single tablet and hosted on a single TabletServer since Accumulo never splits rows across tablets. Storing the Terms as column families serves to enable fast lookups of all the documents within this bin that contain the given term.
Finally, we perform set intersection operations on the TabletServer via a special iterator called the Intersecting Iterator. Since documents are partitioned into many bins, a search of all documents must search every bin. We can use the BatchScanner to scan all bins in parallel. The Intersecting Iterator should be enabled on a BatchScanner within user query code as follows:
Text[] terms = {new Text("the"), new Text("white"), new Text("house")};

BatchScanner bs = conn.createBatchScanner(table, auths, 20);
IteratorSetting iter = new IteratorSetting(20, "ii", IntersectingIterator.class);
IntersectingIterator.setColumnFamilies(iter, terms);
bs.addScanIterator(iter);
bs.setRanges(Collections.singleton(new Range()));

for(Entry<Key,Value> entry : bs) {
    System.out.println(" " + entry.getKey().getColumnQualifier());
}
This code effectively has the BatchScanner scan all tablets of a table, looking for documents that match all the given terms. Because all tablets are being scanned for every query, each query is more expensive than other Accumulo scans, which typically involve a small number of TabletServers. This reduces the number of concurrent queries supported and is subject to what is known as the ‘straggler’ problem in which every query runs as slow as the slowest server participating.
Of course, fast servers will return their results to the client which can display them to the user immediately while they wait for the rest of the results to arrive. If the results are unordered this is quite effective as the first results to arrive are as good as any others to the user.
8. High-Speed Ingest
Accumulo is often used as part of a larger data processing and storage system. To maximize the performance of a parallel system involving Accumulo, the ingestion and query components should be designed to provide enough parallelism and concurrency to avoid creating bottlenecks for users and other systems writing to and reading from Accumulo. There are several ways to achieve high ingest performance.
8.1. Pre-Splitting New Tables
New tables consist of a single tablet by default. As mutations are applied, the table grows and splits into multiple tablets which are balanced by the Master across TabletServers. This implies that the aggregate ingest rate will be limited to fewer servers than are available within the cluster until the table has reached the point where there are tablets on every TabletServer.
Pre-splitting a table ensures that there are as many tablets as desired available before ingest begins to take advantage of all the parallelism possible with the cluster hardware. Tables can be split at any time by using the shell:
user@myinstance mytable> addsplits -sf /local_splitfile -t mytableFor the purposes of providing parallelism to ingest it is not necessary to create more tablets than there are physical machines within the cluster as the aggregate ingest rate is a function of the number of physical machines. Note that the aggregate ingest rate is still subject to the number of machines running ingest clients, and the distribution of rowIDs across the table. The aggregation ingest rate will be suboptimal if there are many inserts into a small number of rowIDs.
8.2. Multiple Ingester Clients
Accumulo is capable of scaling to very high rates of ingest, which is dependent upon not just the number of TabletServers in operation but also the number of ingest clients. This is because a single client, while capable of batching mutations and sending them to all TabletServers, is ultimately limited by the amount of data that can be processed on a single machine. The aggregate ingest rate will scale linearly with the number of clients up to the point at which either the aggregate I/O of TabletServers or total network bandwidth capacity is reached.
In operational settings where high rates of ingest are paramount, clusters are often configured to dedicate some number of machines solely to running Ingester Clients. The exact ratio of clients to TabletServers necessary for optimum ingestion rates will vary according to the distribution of resources per machine and by data type.
8.3. Bulk Ingest
Accumulo supports the ability to import files produced by an external process such as MapReduce into an existing table. In some cases it may be faster to load data this way rather than via ingesting through clients using BatchWriters. This allows a large number of machines to format data the way Accumulo expects. The new files can then simply be introduced to Accumulo via a shell command.
To configure MapReduce to format data in preparation for bulk loading, the job should be set to use a range partitioner instead of the default hash partitioner. The range partitioner uses the split points of the Accumulo table that will receive the data. The split points can be obtained from the shell and used by the MapReduce RangePartitioner. Note that this is only useful if the existing table is already split into multiple tablets.
user@myinstance mytable> getsplits
aa
ab
ac
...
zx
zy
zz
Run the MapReduce job, using the AccumuloFileOutputFormat to create the files to be introduced to Accumulo. Once this is complete, the files can be added to Accumulo via the shell:
user@myinstance mytable> importdirectory /files_dir /failuresNote that the paths referenced are directories within the same HDFS instance over which Accumulo is running. Accumulo places any files that failed to be added to the second directory specified.
A complete example of using Bulk Ingest can be found at
accumulo/docs/examples/README.bulkIngest
8.4. Logical Time for Bulk Ingest
Logical time is important for bulk imported data, for which the client code may be choosing a timestamp. At bulk import time, the user can choose to enable logical time for the set of files being imported. When its enabled, Accumulo uses a specialized system iterator to lazily set times in a bulk imported file. This mechanism guarantees that times set by unsynchronized multi-node applications (such as those running on MapReduce) will maintain some semblance of causal ordering. This mitigates the problem of the time being wrong on the system that created the file for bulk import. These times are not set when the file is imported, but whenever it is read by scans or compactions. At import, a time is obtained and always used by the specialized system iterator to set that time.
The timestamp assigned by Accumulo will be the same for every key in the file. This could cause problems if the file contains multiple keys that are identical except for the timestamp. In this case, the sort order of the keys will be undefined. This could occur if an insert and an update were in the same bulk import file.
8.5. MapReduce Ingest
It is possible to efficiently write many mutations to Accumulo in parallel via a MapReduce job. In this scenario the MapReduce is written to process data that lives in HDFS and write mutations to Accumulo using the AccumuloOutputFormat. See the MapReduce section under Analytics for details.
An example of using MapReduce can be found under
accumulo/docs/examples/README.mapred
9. Analytics
Accumulo supports more advanced data processing than simply keeping keys sorted and performing efficient lookups. Analytics can be developed by using MapReduce and Iterators in conjunction with Accumulo tables.
9.1. MapReduce
Accumulo tables can be used as the source and destination of MapReduce jobs. To use an Accumulo table with a MapReduce job (specifically with the new Hadoop API as of version 0.20), configure the job parameters to use the AccumuloInputFormat and AccumuloOutputFormat. Accumulo specific parameters can be set via these two format classes to do the following:
-
Authenticate and provide user credentials for the input
-
Restrict the scan to a range of rows
-
Restrict the input to a subset of available columns
9.1.1. Mapper and Reducer classes
To read from an Accumulo table create a Mapper with the following class parameterization and be sure to configure the AccumuloInputFormat.
class MyMapper extends Mapper<Key,Value,WritableComparable,Writable> {
    public void map(Key k, Value v, Context c) {
        // transform key and value data here
    }
}
To write to an Accumulo table, create a Reducer with the following class parameterization and be sure to configure the AccumuloOutputFormat. The key emitted from the Reducer identifies the table to which the mutation is sent. This allows a single Reducer to write to more than one table if desired. A default table can be configured using the AccumuloOutputFormat, in which case the output table name does not have to be passed to the Context object within the Reducer.
class MyReducer extends Reducer<WritableComparable, Writable, Text, Mutation> {
    public void reduce(WritableComparable key, Iterable<Text> values, Context c) {
        Mutation m;
        // create the mutation based on input key and value
        c.write(new Text("output-table"), m);
    }
}
The Text object passed as the output should contain the name of the table to which this mutation should be applied. The Text can be null in which case the mutation will be applied to the default table name specified in the AccumuloOutputFormat options.
9.1.2. AccumuloInputFormat options
Job job = new Job(getConf());

AccumuloInputFormat.setInputInfo(job,
        "user",
        "passwd".getBytes(),
        "table",
        new Authorizations());

AccumuloInputFormat.setZooKeeperInstance(job, "myinstance",
        "zooserver-one,zooserver-two");
Optional settings:
To restrict Accumulo to a set of row ranges:
ArrayList<Range> ranges = new ArrayList<Range>();
// populate array list of row ranges ...
AccumuloInputFormat.setRanges(job, ranges);
To restrict Accumulo to a list of columns:
ArrayList<Pair<Text,Text>> columns = new ArrayList<Pair<Text,Text>>();
// populate list of columns
AccumuloInputFormat.fetchColumns(job, columns);
To use a regular expression to match row IDs:
AccumuloInputFormat.setRegex(job, RegexType.ROW, "^.*");
9.1.3. AccumuloOutputFormat options
boolean createTables = true;
String defaultTable = "mytable";

AccumuloOutputFormat.setOutputInfo(job,
        "user",
        "passwd".getBytes(),
        createTables,
        defaultTable);

AccumuloOutputFormat.setZooKeeperInstance(job, "myinstance",
        "zooserver-one,zooserver-two");
Optional Settings:
AccumuloOutputFormat.setMaxLatency(job, 300000); // milliseconds
AccumuloOutputFormat.setMaxMutationBufferSize(job, 50000000); // bytes
An example of using MapReduce with Accumulo can be found at
accumulo/docs/examples/README.mapred
9.2. Combiners
Many applications can benefit from the ability to aggregate values across common keys. This can be done via Combiner iterators and is similar to the Reduce step in MapReduce. This provides the ability to define online, incrementally updated analytics without the overhead or latency associated with batch-oriented MapReduce jobs.
All that is needed to aggregate values of a table is to identify the fields over which values will be grouped, insert mutations with those fields as the key, and configure the table with a combining iterator that supports the summarizing operation desired.
The only restriction on an combining iterator is that the combiner developer should not assume that all values for a given key have been seen, since new mutations can be inserted at any time. This precludes using the total number of values in the aggregation such as when calculating an average, for example.
9.2.1. Feature Vectors
An interesting use of combining iterators within an Accumulo table is to store feature vectors for use in machine learning algorithms. For example, many algorithms such as k-means clustering, support vector machines, anomaly detection, etc. use the concept of a feature vector and the calculation of distance metrics to learn a particular model. The columns in an Accumulo table can be used to efficiently store sparse features and their weights to be incrementally updated via the use of an combining iterator.
9.3. Statistical Modeling
Statistical models that need to be updated by many machines in parallel could be similarly stored within an Accumulo table. For example, a MapReduce job that is iteratively updating a global statistical model could have each map or reduce worker reference the parts of the model to be read and updated through an embedded Accumulo client.
Using Accumulo this way enables efficient and fast lookups and updates of small pieces of information in a random access pattern, which is complementary to MapReduce’s sequential access model.
10. Security
Accumulo extends the BigTable data model to implement a security mechanism known as cell-level security. Every key-value pair has its own security label, stored under the column visibility element of the key, which is used to determine whether a given user meets the security requirements to read the value. This enables data of various security levels to be stored within the same row, and users of varying degrees of access to query the same table, while preserving data confidentiality.
10.1. Security Label Expressions
When mutations are applied, users can specify a security label for each value. This is done as the Mutation is created by passing a ColumnVisibility object to the put() method:
Text rowID = new Text("row1");
Text colFam = new Text("myColFam");
Text colQual = new Text("myColQual");
ColumnVisibility colVis = new ColumnVisibility("public");
long timestamp = System.currentTimeMillis();

Value value = new Value("myValue");

Mutation mutation = new Mutation(rowID);
mutation.put(colFam, colQual, colVis, timestamp, value);
10.2. Security Label Expression Syntax
Security labels consist of a set of user-defined tokens that are required to read the value the label is associated with. The set of tokens required can be specified using syntax that supports logical AND and OR combinations of tokens, as well as nesting groups of tokens together.
For example, suppose within our organization we want to label our data values with security labels defined in terms of user roles. We might have tokens such as:
admin
audit
system
These can be specified alone or combined using logical operators:
// Users must have admin privileges:
admin
// Users must have admin and audit privileges
admin&audit// Users with either admin or audit privileges
admin|audit// Users must have audit and one or both of admin or system
(admin|system)&auditWhen both | and & operators are used, parentheses must be used to specify
precedence of the operators.
10.3. Authorization
When clients attempt to read data from Accumulo, any security labels present are examined against the set of authorizations passed by the client code when the Scanner or BatchScanner are created. If the authorizations are determined to be insufficient to satisfy the security label, the value is suppressed from the set of results sent back to the client.
Authorizations are specified as a comma-separated list of tokens the user possesses:
// user possesses both admin and system level access
Authorization auths = new Authorization("admin","system");

Scanner s = connector.createScanner("table", auths);
10.4. User Authorizations
Each Accumulo user has a set of associated security labels. To manipulate these in the shell while using the default authorizor, use the setuaths and getauths commands. These may also be modified for the default authorizor using the java security operations API.
When a user creates a scanner a set of Authorizations is passed. If the authorizations passed to the scanner are not a subset of the users authorizations, then an exception will be thrown.
To prevent users from writing data they can not read, add the visibility constraint to a table. Use the -evc option in the createtable shell command to enable this constraint. For existing tables use the following shell command to enable the visibility constraint. Ensure the constraint number does not conflict with any existing constraints.
config -t table -s table.constraint.1=org.apache.accumulo.core.security.VisibilityConstraintAny user with the alter table permission can add or remove this constraint. This constraint is not applied to bulk imported data, if this a concern then disable the bulk import permission.
10.5. Pluggable Security
New in 1.5 of Accumulo is a pluggable security mechanism. It can be broken into three actions — authentication, authorization, and permission handling. By default all of these are handled in Zookeeper, which is how things were handled in Accumulo 1.4 and before. It is worth noting at this point, that it is a new feature in 1.5 and may be adjusted in future releases without the standard deprecation cycle.
Authentication simply handles the ability for a user to verify their integrity. A combination of
principal and authentication token are used to verify a user is who they say they are. An
authentication token should be constructed, either directly through its constructor, but it is
advised to use the init(Property) method to populate an authentication token. It is expected that a
user knows what the appropriate token to use for their system is. The default token is
PasswordToken.
Once a user is authenticated by the Authenticator, the user has access to the other actions within Accumulo. All actions in Accumulo are ACLed, and this ACL check is handled by the Permission Handler. This is what manages all of the permissions, which are divided in system and per table level. From there, if a user is doing an action which requires authorizations, the Authorizor is queried to determine what authorizations the user has.
This setup allows a variety of different mechanisms to be used for handling different aspects of Accumulo’s security. A system like Kerberos can be used for authentication, then a system like LDAP could be used to determine if a user has a specific permission, and then it may default back to the default ZookeeperAuthorizor to determine what Authorizations a user is ultimately allowed to use. This is a pluggable system so custom components can be created depending on your need.
10.6. Secure Authorizations Handling
For applications serving many users, it is not expected that an Accumulo user will be created for each application user. In this case an Accumulo user with all authorizations needed by any of the applications users must be created. To service queries, the application should create a scanner with the application user’s authorizations. These authorizations could be obtained from a trusted 3rd party.
Often production systems will integrate with Public-Key Infrastructure (PKI) and designate client code within the query layer to negotiate with PKI servers in order to authenticate users and retrieve their authorization tokens (credentials). This requires users to specify only the information necessary to authenticate themselves to the system. Once user identity is established, their credentials can be accessed by the client code and passed to Accumulo outside of the reach of the user.
10.7. Query Services Layer
Since the primary method of interaction with Accumulo is through the Java API, production environments often call for the implementation of a Query layer. This can be done using web services in containers such as Apache Tomcat, but is not a requirement. The Query Services Layer provides a mechanism for providing a platform on which user facing applications can be built. This allows the application designers to isolate potentially complex query logic, and enables a convenient point at which to perform essential security functions.
Several production environments choose to implement authentication at this layer, where users identifiers are used to retrieve their access credentials which are then cached within the query layer and presented to Accumulo through the Authorizations mechanism.
Typically, the query services layer sits between Accumulo and user workstations.
11. Administration
11.1. Hardware
Because we are running essentially two or three systems simultaneously layered across the cluster: HDFS, Accumulo and MapReduce, it is typical for hardware to consist of 4 to 8 cores, and 8 to 32 GB RAM. This is so each running process can have at least one core and 2 - 4 GB each.
One core running HDFS can typically keep 2 to 4 disks busy, so each machine may typically have as little as 2 x 300GB disks and as much as 4 x 1TB or 2TB disks.
It is possible to do with less than this, such as with 1u servers with 2 cores and 4GB each, but in this case it is recommended to only run up to two processes per machine — i.e. DataNode and TabletServer or DataNode and MapReduce worker but not all three. The constraint here is having enough available heap space for all the processes on a machine.
11.2. Network
Accumulo communicates via remote procedure calls over TCP/IP for both passing data and control messages. In addition, Accumulo uses HDFS clients to communicate with HDFS. To achieve good ingest and query performance, sufficient network bandwidth must be available between any two machines.
11.3. Installation
Choose a directory for the Accumulo installation. This directory will be referenced
by the environment variable $ACCUMULO_HOME. Run the following:
$ tar xzf accumulo-1.5.0-bin.tar.gz    # unpack to subdirectory
$ mv accumulo-1.5.0 $ACCUMULO_HOME # move to desired location
Repeat this step at each machine within the cluster. Usually all machines have the
same $ACCUMULO_HOME.
11.4. Dependencies
Accumulo requires HDFS and ZooKeeper to be configured and running before starting. Password-less SSH should be configured between at least the Accumulo master and TabletServer machines. It is also a good idea to run Network Time Protocol (NTP) within the cluster to ensure nodes' clocks don’t get too out of sync, which can cause problems with automatically timestamped data.
11.5. Configuration
Accumulo is configured by editing several Shell and XML files found in
$ACCUMULO_HOME/conf. The structure closely resembles Hadoop’s configuration
files.
11.5.1. Edit conf/accumulo-env.sh
Accumulo needs to know where to find the software it depends on. Edit accumulo-env.sh and specify the following:
-
Enter the location of the installation directory of Accumulo for
$ACCUMULO_HOME -
Enter your system’s Java home for
$JAVA_HOME -
Enter the location of Hadoop for
$HADOOP_PREFIX -
Choose a location for Accumulo logs and enter it for
$ACCUMULO_LOG_DIR -
Enter the location of ZooKeeper for
$ZOOKEEPER_HOME
By default Accumulo TabletServers are set to use 1GB of memory. You may change
this by altering the value of $ACCUMULO_TSERVER_OPTS. Note the syntax is that of
the Java JVM command line options. This value should be less than the physical
memory of the machines running TabletServers.
There are similar options for the master’s memory usage and the garbage collector process. Reduce these if they exceed the physical RAM of your hardware and increase them, within the bounds of the physical RAM, if a process fails because of insufficient memory.
Note that you will be specifying the Java heap space in accumulo-env.sh. You should make sure that the total heap space used for the Accumulo tserver and the Hadoop DataNode and TaskTracker is less than the available memory on each slave node in the cluster. On large clusters, it is recommended that the Accumulo master, Hadoop NameNode, secondary NameNode, and Hadoop JobTracker all be run on separate machines to allow them to use more heap space. If you are running these on the same machine on a small cluster, likewise make sure their heap space settings fit within the available memory.
11.5.2. Native Map
The tablet server uses a data structure called a MemTable to store sorted key/value pairs in memory when they are first received from the client. When a minor compaction occurs, this data structure is written to HDFS. The MemTable will default to using memory in the JVM but a JNI version, called the native map, can be used to significantly speed up performance by utilizing the memory space of the native operating system. The native map also avoids the performance implications brought on by garbage collection in the JVM by causing it to pause much less frequently.
32-bit and 64-bit Linux versions of the native map ship with the Accumulo dist package. For other operating systems, the native map can be built from the codebase in two ways- from maven or from the Makefile.
-
Build from maven using the following command:
mvn clean package -Pnative. -
Build from the c++ source by running
makein the$ACCUMULO_HOME/server/src/main/c++directory.
After building the native map from the source, you will find the artifact in
$ACCUMULO_HOME/lib/native. Upon starting up, the tablet server will look
in this directory for the map library. If the file is renamed or moved from its
target directory, the tablet server may not be able to find it.
11.5.3. Cluster Specification
On the machine that will serve as the Accumulo master:
-
Write the IP address or domain name of the Accumulo Master to the
$ACCUMULO_HOME/conf/mastersfile. -
Write the IP addresses or domain name of the machines that will be TabletServers in
$ACCUMULO_HOME/conf/slaves, one per line.
Note that if using domain names rather than IP addresses, DNS must be configured properly for all machines participating in the cluster. DNS can be a confusing source of errors.
11.5.4. Accumulo Settings
Specify appropriate values for the following settings in $ACCUMULO_HOME/conf/accumulo-site.xml:
<property>
    <name>instance.zookeeper.host</name>
    <value>zooserver-one:2181,zooserver-two:2181</value>
    <description>list of zookeeper servers</description>
</property>
This enables Accumulo to find ZooKeeper. Accumulo uses ZooKeeper to coordinate settings between processes and helps finalize TabletServer failure.
<property>
    <name>instance.secret</name>
    <value>DEFAULT</value>
</property>
The instance needs a secret to enable secure communication between servers. Configure your
secret and make sure that the accumulo-site.xml file is not readable to other users.
Some settings can be modified via the Accumulo shell and take effect immediately, but some settings require a process restart to take effect. See the configuration documentation (available on the monitor web pages) for details.
11.5.5. Deploy Configuration
Copy the masters, slaves, accumulo-env.sh, and if necessary, accumulo-site.xml
from the $ACCUMULO_HOME/conf/ directory on the master to all the machines
specified in the slaves file.
11.6. Initialization
Accumulo must be initialized to create the structures it uses internally to locate data across the cluster. HDFS is required to be configured and running before Accumulo can be initialized.
Once HDFS is started, initialization can be performed by executing
$ACCUMULO_HOME/bin/accumulo init . This script will prompt for a name
for this instance of Accumulo. The instance name is used to identify a set of tables
and instance-specific settings. The script will then write some information into
HDFS so Accumulo can start properly.
The initialization script will prompt you to set a root password. Once Accumulo is initialized it can be started.
11.7. Running
11.7.1. Starting Accumulo
Make sure Hadoop is configured on all of the machines in the cluster, including
access to a shared HDFS instance. Make sure HDFS and ZooKeeper are running.
Make sure ZooKeeper is configured and running on at least one machine in the
cluster.
Start Accumulo using the bin/start-all.sh script.
To verify that Accumulo is running, check the Status page as described under Monitoring. In addition, the Shell can provide some information about the status of tables via reading the !METADATA table.
11.7.2. Stopping Accumulo
To shutdown cleanly, run bin/stop-all.sh and the master will orchestrate the
shutdown of all the tablet servers. Shutdown waits for all minor compactions to finish, so it may
take some time for particular configurations.
11.7.3. Adding a Node
Update your $ACCUMULO_HOME/conf/slaves (or $ACCUMULO_CONF_DIR/slaves) file to account for the addition.
$ACCUMULO_HOME/bin/accumulo admin start <host(s)> {<host> ...}Alternatively, you can ssh to each of the hosts you want to add and run
$ACCUMULO_HOME/bin/start-here.sh.
Make sure the host in question has the new configuration, or else the tablet server won’t start; at a minimum this needs to be on the host(s) being added, but in practice it’s good to ensure consistent configuration across all nodes.
11.7.4. Decomissioning a Node
If you need to take a node out of operation, you can trigger a graceful shutdown of a tablet server. Accumulo will automatically rebalance the tablets across the available tablet servers.
$ACCUMULO_HOME/bin/accumulo admin stop <host(s)> {<host> ...}Alternatively, you can ssh to each of the hosts you want to remove and run
$ACCUMULO_HOME/bin/stop-here.sh.
Be sure to update your $ACCUMULO_HOME/conf/slaves (or $ACCUMULO_CONF_DIR/slaves) file to
account for the removal of these hosts. Bear in mind that the monitor will not re-read the
slaves file automatically, so it will report the decomissioned servers as down; it’s
recommended that you restart the monitor so that the node list is up to date.
11.8. Monitoring
The Accumulo Master provides an interface for monitoring the status and health of
Accumulo components. This interface can be accessed by pointing a web browser to
http://accumulomaster:50095/status
11.9. Tracing
It can be difficult to determine why some operations are taking longer than expected. For example, you may be looking up items with very low latency, but sometimes the lookups take much longer. Determining the cause of the delay is difficult because the system is distributed, and the typical lookup is fast.
Accumulo has been instrumented to record the time that various operations take when tracing is turned on. The fact that tracing is enabled follows all the requests made on behalf of the user throughout the distributed infrastructure of accumulo, and across all threads of execution.
These time spans will be inserted into the trace table in
Accumulo. You can browse recent traces from the Accumulo monitor
page. You can also read the trace table directly like any
other table.
The design of Accumulo’s distributed tracing follows that of Google’s Dapper.
11.9.1. Tracers
To collect traces, Accumulo needs at least one server listed in
$ACCUMULO_HOME/conf/tracers. The server collects traces
from clients and writes them to the trace table. The Accumulo
user that the tracer connects to Accumulo with can be configured with
the following properties
trace.user
trace.token.property.password
11.9.2. Instrumenting a Client
Tracing can be used to measure a client operation, such as a scan, as the operation traverses the distributed system. To enable tracing for your application call
DistributedTrace.enable(instance, new ZooReader(instance), hostname, "myApplication");
Once tracing has been enabled, a client can wrap an operation in a trace.
Trace.on("Client Scan");
BatchScanner scanner = conn.createBatchScanner(...);
// Configure your scanner
for (Entry entry : scanner) {
}
Trace.off();
Additionally, the user can create additional Spans within a Trace.
Trace.on("Client Update");
...
Span readSpan = Trace.start("Read");
...
readSpan.stop();
...
Span writeSpan = Trace.start("Write");
...
writeSpan.stop();
Trace.off();
Like Dapper, Accumulo tracing supports user defined annotations to associate additional data with a Trace.
...
int numberOfEntriesRead = 0;
Span readSpan = Trace.start("Read");
// Do the read, update the counter
...
readSpan.data("Number of Entries Read", String.valueOf(numberOfEntriesRead));
Some client operations may have a high volume within your application. As such, you may wish to only sample a percentage of operations for tracing. As seen below, the CountSampler can be used to help enable tracing for 1-in-1000 operations
Sampler sampler = new CountSampler(1000);
...
if (sampler.next()) {
  Trace.on("Read");
}
...
Trace.offNoFlush();
It should be noted that it is safe to turn off tracing even if it
isn’t currently active. The Trace.offNoFlush() should be used if the
user does not wish to have Trace.off() block while flushing trace
data.
11.9.3. Viewing Collected Traces
To view collected traces, use the "Recent Traces" link on the Monitor
UI. You can also programmatically access and print traces using the
TraceDump class.
11.9.4. Tracing from the Shell
You can enable tracing for operations run from the shell by using the
trace on and trace off commands.
root@test test> trace on
root@test test> scan
a b:c []    d
root@test test> trace off
Waiting for trace information
Waiting for trace information
Trace started at 2013/08/26 13:24:08.332
Time  Start  Service@Location       Name
 3628+0      shell@localhost shell:root
    8+1690     shell@localhost scan
    7+1691       shell@localhost scan:location
    6+1692         tserver@localhost startScan
    5+1692           tserver@localhost tablet read ahead 6
11.10. Logging
Accumulo processes each write to a set of log files. By default these are found under
$ACCUMULO/logs/.
11.11. Recovery
In the event of TabletServer failure or error on shutting Accumulo down, some mutations may not have been minor compacted to HDFS properly. In this case, Accumulo will automatically reapply such mutations from the write-ahead log either when the tablets from the failed server are reassigned by the Master (in the case of a single TabletServer failure) or the next time Accumulo starts (in the event of failure during shutdown).
Recovery is performed by asking a tablet server to sort the logs so that tablets can easily find their missing updates. The sort status of each file is displayed on Accumulo monitor status page. Once the recovery is complete any tablets involved should return to an “online” state. Until then those tablets will be unavailable to clients.
The Accumulo client library is configured to retry failed mutations and in many cases clients will be able to continue processing after the recovery process without throwing an exception.